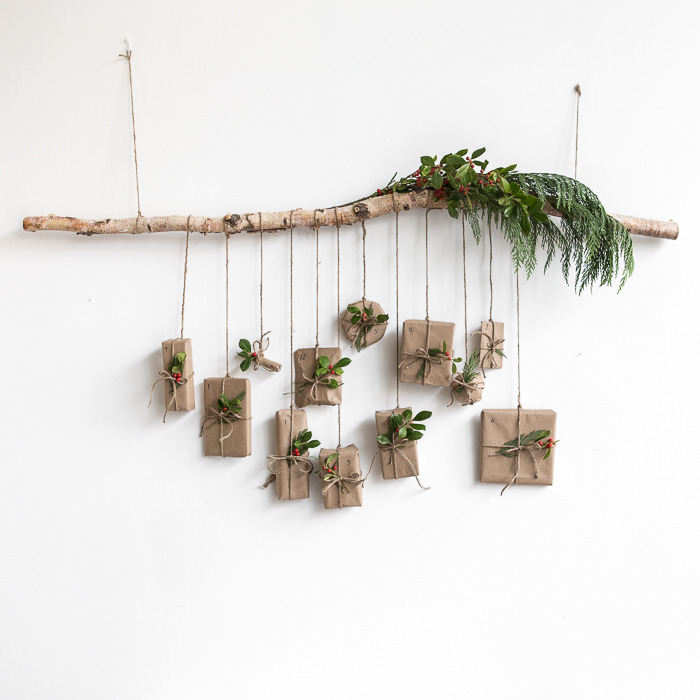
What you’ll need to make:
- Sturdy (dry) branch or bit of Christmas foliage
- 25 different sized brown envelopes
- Strong string
- Nail to hang it on the wall
- 25 different sized gift tags
- Pen or number stamp
- Christmas lights (optional)
What you’ll need to fill the calendar:
25 different treats or gifts. They don’t need to all be edible, but your dog will love it if they are! We’ve used our own tails.com treats here because as any tails.com customer will know, you get a treat allowance as part of your dog’s daily feeding plan, so it’s easy to know what you’re feeding without going overboard.
Dental Dailies
Star-shaped (so Christmassy!) and available here in small, medium and large, they’re one-a-day treats so one per envelope
Good Dog treats
Super small, and low in cals at only 3kcal per mini bone, this pint-sized treat will be good to sit in an envelope for a week or two (just don’t hang your calendar over a heat source otherwise things will start to smell ripe).
Christmas Cracker
Available from the Christmas shop
Superfood Bites
These come in so many different flavours, it’ll be hard to choose which to include!
Christmas bakes
If you can’t bear to wait until the big day, crack open the tails.com Christmas bakes treat and pop a few in an envelope then seal (the box is so pretty though, you might want to save it all for December 25th!
Bandana
If you want to get away from food-oriented treats, but still want to treat them, why not opt for a cute bandana instead?
Squeaky toy
We haven’t met a dog who doesn’t love a squeak.
How to assemble:
- First make your gift tags
Number them from 1-25 in pen, using a stamp or with paints.
Decorate or pop a message on with your dog’s favourite words if you’re feeling super creative.
- Fill them
Put the 25 gifts you’ve chosen into their envelopes and seal.
- Sort the string
Cut 25 pieces of string – you can choose the same length for them all, or lots of different lengths if you prefer. You’ll use them to attach your cards and loop over your branch, too
- Attach the string
Blob a bit of glue on the back and glue one end of your string to it. Allow to dry and repeat with your other envelopes.
- Get the branch
Starting from the left of your branch and working to the right. Loop the loose part of string from Envelope No. 1 – over the branch and glue to secure it at the back of the envelope – so you can only see the gift tag on the front. Repeat with your remaining envelopes.
- Decorate the branch
If you’re not using foliage and you want to add a bit of green – or some battery-operated fairy lights – wrap them around your branch and secure.
- Nearly there!
To hang it – wrap and tie a longer piece of (strong) string around each end of your branch – it needs to be long enough to hang on the wall. This is your hook.
Get hanging – your beautiful, dog-friendly advent calendar is ready for the wall – and to pop on Instagram, of course. Tag your DIY creations using #tailsdotcom
I am a little late this year but will have to keep this so I can do it next year.